Archive for the ‘development’ Category

Civilian autonomous and remote controlled drones

Thursday, September 17th, 2009

Here’s a quick summary of some of the most interesting autonomous and remote controlled drones out there today. The occasion is that I and 3 others have built a quadcopter drone last semester with the goal to fly it autonomously. While the time we had to finish the project was limited and our project did not reach full autonomous flight just yet we learned a lot about the system and the challenges of such an endeavor. One team member has made the project his diploma thesis and continues to work on the vehicle.

bird DSC_0007

The two images show our drone dubbed B.I.R.D. (Basic intelligent research drone) in flight and the microcontrollers and sensors that control the drone. It is based on the the Mikrokopter project.

Another very interesting drone is the nano air vehicle by AeroVironment. It’s a flapping-wing vehicle for indoors use. Check out this amazing video to see it in action. I’m guessing that while the flapping-wing design is a lot more complicated than the brushless motors in our drone it is more energy efficient.

The third drone I would like to share was built by Armadillo Aerospace. They claim level 2 of the Northrop Grumman Lunar Lander Challenge with it. For more information read on here and be sure to check out this video. Notice how large this vehicle is (can be seen in the end of the video).

The fourth drone is really scary. And it’s not civilian at all. It’s called the Multiple Kill Vehicle and was supposed to shoot down intercontinental rockets in space. The project is apparently canceled but the video is impressive and scary nevertheless. Check it out here.

Update: Researchers at MIT’s Robust Robotics Group have developed a robotic helicopter capable of autonomously flying inside buildings or other GPS-denied environments. Here’s a very interesting video about their project. They achieved what we planned for our project – and I have to say it is very impressive and they did an excellent job.

Visualizing Multithreading

Saturday, July 18th, 2009

I’ve been pondering about the question of how to model and visualize multithreaded applications in a simple, efficient and aesthetic way. Naturally I’ve been looking into UML behavior diagrams first but I was not really satisfied with what I found. Now I am not an expert on UML but I know my way around class diagrams, activity diagrams, sequence diagram and state machines but they all did not seem to fit what I wanted to visualize.

I wanted to show multiple threads communicating and synchronizing with each other. I’ve read the argument that something like multithreading concerns only the implementation of a system and can thus be ignored when modeling. I agree with the argument however there will come a time in the development phase of a system when one needs to think about multithreading and one wants to sketch out how the system facilitates multiple threads to be efficient. And for that I have not found good tool within UML.

multithreadingsmall

So I searched for examples of diagrams that visualize multithreading. The collage shows 4 different diagrams I found rather interesting. The first one is from this page about a traffic simulator written in Java (orignal image). It shows different threads and how they signal each other. It’s simple yet quite clear what is going an. The second image is taken from a CodeProject documentation about a genetic library (original image). It sort of uses UML symbols but it’s not clear what happens at the fork and join points. The way I figure it, those symbols inside the threads are supposed to be branches not forks. The third image is also from a CodeProject page – this time it’s a how-to about avoiding an exception when using multiple threads (original image). It reminds me of a sequence diagram. There are no blocking states in the diagram and I figure in this particular application the threads are non-blocking so diagram fits the application perfectly. The fourth diagram I liked the most. It’s from the Multithreaded Programming with ThreadMentor tutorial (original image) and has special symbols for sending signals and waiting for signals.

threading

So I gave it a try myself and tried to model a simple controller and worker thread scenario based on the last of the example diagrams I found. The gray boxes and circle represent a signaling concept where one thread can send a signal and the other thread waits until it receives the signal. I also included a shared variable that handles the task shutdown. One thread can set the variable and the other branches depending on that variable. I am not happy yet with this particular part of the image. If anyone has a better idea or pointer to resources on that topic feel free to leave a comment.

Building a simple ECG Amplifier

Saturday, December 20th, 2008

A friend and I joined forces to build a simple ECG (or EKG) Amplifier for our Signal Processing class at University of Applied Sciences Regensburg. We searched the web, magazines and books for suitable circuit diagrams and instructions on how to build one. We found that the instrumentation amplifier INA121 (datasheet) was a suitable IC and also the precision instrumentation amplifier AD624 (datasheet) mentioned in this Scientific American article seem to be viable option. However as it turned out those ICs are very hard to come by and rather expensive ranging from about $10 to over $50.

We also found a quite professional solution in Funkamateur, edition 12/93, pages 794-796. The article is in German and can be found here. We found another very simple circuit diagram for an amplifier in Elektor, edition 7-8/2000 that we ended up building. Here’s the diagram:

The components cost about 10 Euro. We built it on two breadboards one for the amplifier itself and one for the power supply. With two 9V batteries connected it supplies -9V and +9V. Here’s a picture of the amplifier board:

Green red and black cables are connected to the power supply, the thick black cables are connected to the subject and at the bottom there are two pins to connect the oscilloscope probe or an AD-converter.
We used real ECG pads from the hospital to collect the signal from the subject. At first we used regular unshielded copper cables to connect the electrodes which resulted in a lot of noise. We then replaced the copper cables with shielded thin microphone cables and connected the shield to ground. This hugely reduced the signal noise. Here’s an image showing an EKG taken with our amplifier:

The electrodes are connected to right hand, left hand and right foot. As you can see it’s pretty much what you would expect. You can see the P-wave, the QRS-complex and the T-wave. We’re quite happy with the results.

If you try to build something like this yourself please be advised that you should be careful when connecting this amplifier to anything that carries high voltage (line voltage). The amplification circuit and measuring devices are not separated from each other. So you should only use battery powered devices like a USB oscilloscopes connected to a laptop running on battery. This is important as you consciously connect the subject to your circuit in a very well conducting manner (because that’s what you want) and at very dangerous points. So you should take care that no high voltages can flow between the electrodes at any time.

Convertig CSV files to LibSea graph files for CAIDA’s Walrus

Sunday, October 5th, 2008

Quite a few responses to my posts about social network visualization with Walrus contained questions about how to create the input files for Walrus. Walrus itself is very well documented and the LibSea graph file format is also explained in detail. But people seem to run into trouble when trying to create the spanning tree required for Walrus.

The Walrus documentation states that it only makes sense to visualize data that contain a meaningful spanning tree and that visualizations created with the help of an arbitrary spanning tree are not very useful. While that’s probably true the visualizations still look awesome. And I guess that’s what people want. Furthermore Raffael Marty from secviz.org contacted me and asked if I had a tool that could read CSV files as input and output a LibSea file for Walrus.

I didn’t have such a tool but it sounded like a fun challenge and I thought that such a tool might also help all the people who run into trouble when trying to create a spanning tree for their graphs. So I created walruscsv – a command line tool written in C++ that reads a CSV and outputs a LibSea graph file that can be visualized with Walrus. The CSV file hast to contain a link in each row and consist of 2 columns. The first column in each row represents the first node of the link and the second column the second node of the link. It automatically generates an arbitrary spanning tree.

A sample CSV file containing the links node1<->node2, node1<->node3, node3<->node4 could look like this:

node1,node2
node1,node3
node3,node4

Although Walrus is only capable of visualizing one network at a time walruscsv can handle multiple networks in one CSV file. It creates an arbitrary node and connects a node of each network to that node enabling Walrus to visualize the data. Currently the tool creates an arbitrary spanning tree so it’s not weighted and therefore not minimal.

Walruscsv reads the name of the CSV file to process as the first command line parameter passed to it. It is released under a non restrictive open source license so in addition to binaries the source code is provided. To compile it using the GNU C++ compiler simply type:

g++ wlink.cpp main.cpp wtree.cpp -o walrus.exe

You can use the program by typing

walrus.exe testfile1.csv

whereas testfile1.csv is the CSV file containing the graphs you want to visualize. Bloodshed Dev-C++ can also be used to compile the code and although I didn’t try it it should also work with C++ compilers from Microsoft (e.g. using Visual Studio). Here are the files:

Source code (the source code released to the public domain)
Test files (a collection of test CSV files)
Win32 binary
Debian x86 64bit binary

If you’re having trouble using or compiling the tool or if you have suggestions or comments of if you find a bug feel free to contact me or leave a comment.

Visualization of Social Network Reloaded

Friday, September 12th, 2008

Update: I created a tool to convert CSV files to Walrus compatible LibSea files. Check out walruscvs here.

About one and a half years ago I spent a considerable amount of time experimenting with social network visualization. My methods to gather and generate the data for the visualization tools I used were very limited.

However just after posting my first results I stumbled upon the Studivz Statistics page created by Hagen Fritsch who crawled the entire social network within only 4 hours in November 2006. Back then security measures were virtually non existent so it was an easy thing to do. Today the Studivz (which is a German Facebook clone) uses a Captcha to prevent such endeavors.

Hagen Fritsch was so kind as to make the data he crawled available to me. Thanks Hagen! Not all the data, just the relevant pages to determine the connections between users in particular the “Friends” pages. So now after 1 and a half years I found some time to look at the data, analyze it and feed it to Walrus. Some results:

Social Network Visualization with Walrus 1 Social Network Visualization with Walrus 5

The first graph consists of 17142 nodes and 22838 links whereas 17141 links are part of the spanning tree Walrus uses for rendering. The second graph consists of 25313 nodes and 37794 links. Four levels of the social network are displayed meaning the tree’s depth is 4.

Huge Social Network Visualization with Walrus 5 Huge Social Network Visualization with Walrus 6

This two images show one of the largest graphs I created: 413193 nodes and 1247702 links with a tree depth of four. The left images only shows the spanning tree and the image on the right shows the entire network. When working with such large networks I encountered a couple of problems.

I was using PHP to create the Walrus graph file. Because of the spanning tree this is no trivial task and it became very clear that PHP is the wrong tool for it. A PHP script ran for about 4 hours to create a 30000 node graph file. I wanted bigger trees so I ported the PHP script to C++ and was surprised to find that the same task took mere seconds. This is not due to inefficient coding but PHP definitely has problems when dealing with huge junks of data especially when they are stored in associative arrays. In C++ I used hash_maps which worked out perfectly. Here are two more images of the above network:

Huge Social Network Visualization with Walrus 4 Huge Social Network Visualization with Walrus 3

My Celeron 1.7GHz 512MB RAM workstation thought I was being ridiculous when I loaded the 60MB text file that contained the graph into Walrus. After some swapping and heavy calculation it worked reasonably well though.

If you feel like playing around with Walrus and the data here’s a zip file containing the 3 networks on display. You can get Walrus form here. Start Walrus with the following command:

java -Xmx512m -cp mp.jar;antlrall-mod.jar;libsea.jar;walrus.jar H3Main

I added the “-Xmx512m” part to allow java to allocate more memory. This is necessary for the very large graph file. Enjoy! I will try to add a video in the next couple of days. I was also able to extract the university each of the members of the social networks attends so there are a couple of possibilities to create more visualizations.

Random Pixel Tile Map Generator

Friday, August 8th, 2008

I found something to do that connects the things that interest me most at the moment: automatically generated game content, number juggling in Matlab, browser games and pixel art. I’m not much of an artist so all I can do regarding pixel art is being astonished about the marvelous things pixel artists are able to do. However being a programmer I thought of a way to circumvent the art part and still create something cool. So the idea is to let the computer create the art by means of a random number generation and some number juggling.

Pixel Tiles 
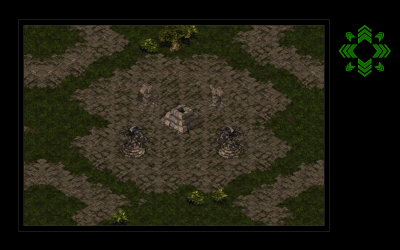
I wrote a script that creates a pixel tile based map from a random height map and created 6 pixel tiles for the different heights. I wanted water, a beach, nice grasslands and icy mountains. To generate the height map I used Matlab. I tried a couple of different techniques and finally ended up using a perlin noise algorithm.

I also experimented with a simple Gaussian distribution random number generator and tried to fit the numbers to my needs. However it turned out to be ‘too’ noisy as I was aiming for continents and large mountain ranges. The Gaussian distribution however gave me only small islands. I tried to smooth it with different filters which made it a little better but I realized the numbers where fundamentally different from what I wanted.

Tilemap created with Gaussian Distribution of Random NumbersTilemap created with Gaussian Distribution of Random Numbers and Gaussian BlurTilemap2 created with Perlin Noise

The image on the left is created with Gaussian distribution, the second has a 7×7 Gaussian blur filter applied 3 times and the third one is created with Perlin noise. Go ahead and click on the images to view the full size version. They are quite large so they might take a second to load. I got the matlab code for the Perlin noise generator from Christopher Wellons’ blog post about Noise Fractals and Clouds. He wrote it for GNU Octave, a tool which I have to try out yet. To use it in Matlab only a slight modification was necessary:

function s = perlin (m)
  s = zeros(m);                                    % output image
  w = m;                                 % width of current layer
  i = 0;                                             % iterations
  
  while w > 3
    i = i + 1;
    d = interp2(randn(w), i-1, 'spline');
    s = s + i * d(1:m, 1:m);
    w = w - ceil(w/2 - 1);
  end
end

Now this looks quite inconspicuous but there’s quite something to those 11 lines of code. The interp2() function recursively expands the matrix returned by rand(w) i-1 times with spline interpolation. This contains the frequency of the the function and the i in the following line represents the amplitude. Quite elegant really! The only thing to criticize about this code is probably that it can’t exploit the fact that Perlin noise can create continuous noise resulting in an infinite world. To do that I guess you need a seeded random number generator. Matlab let’s you save and restore the state of the generator with:

s = randn('state');          %save state to s
randn('state',s);            %restore state from s

which might enable you to accomplish just that. And finally here’s a PHP script that let’s you generate a map based on a height map in a CSV File (sample file). Be warned though: PHP is a very bad choice to do these kinds of things and the script is therefore very slow. A ZIP file containing the PHP script, the test data and the 6 separate pixel tiles can be downloaded from here.

Fourth Prototype

Monday, July 21st, 2008

Prototype Updated (see below).

There’s a great old space strategy game called “Ascendancy” (download and play with DosBox). One unique feature of the game is the intriguing 3D map of the universe. It’s from 1995 and now in 2008 such a 3D map can easily be implemented. But I like browser based games so the challenge was to implement the thing inside the browser. Turns out that’s also not very complicated when using the canvas tag supported by Firefox, Safari (Webkit) and Opera browsers. Here’s a warning for Internet Explorer users: the prototype won’t work very well. I’m using Google’s Explorercanvas – it emulates canvas-tag behavior but it is therefor very slow. So please consider using one of the afore mentioned browsers to test it.

Go ahead and start the prototype.

A random universe is created and rotates around the y-axis. You may change the continuous rotation axis, activate and deactivate starlanes, change the number of stars, change the size of stars, change the number of starlanes and change the rotation speed. You can also rotate the universe by moving the mouse over one of the arrows in the small coordinate system on the right. Additionally you can select stars by clicking on them. This works best when the stars are not moving and when they are not too small. Here’s an image of the whole thing:

Ascendancy Starmap

It should work reasonably well depending on the number of elements displayed and your hardware specifications. I found that Opera renders the universe a tad faster than Firefox. I’m using Prototype and the Script.aculo.us slider to help out with the Javascript and the user interface.

Three things I still have to iron out: 1) dragging the universe with the mouse 2) zooming and 3) the depth is not correct. This is visible when rendering large stars. Stars are always drawn in the same order and a star actually behind another one could be drawn in front of it. But that’s hardly visible when using smaller stars so I think it’s alright for now.

The code is released under a non restrictive open source license. The source code is fairly well documented (use tab size of 2). Have fun.

Update: A friend of mine pointed out that the prototype reminded her of a lottery drawing. I don’t think she’s very much into space and science fiction mumbo jumbo or computer games for that matter but she’s got a point. Galaxies don’t look like that! So I added a spiral galaxy generator to the prototype. The code is based on a very good article called “Making Galaxies”. I added the calculation of the third dimension so that the height of the galaxy disk is small in the center and high at the edge.

In spiral galaxy mode you need a lot of stars to actually see a nice galaxy (say 600). The starsize should also be reduced. In case you feel like playing around with the galaxy generator, here’s the testscript I used: galaxy.html.

Third Prototype

Wednesday, June 25th, 2008

So I made a third prototype. It’s still very much a work in progress but have a look at it anyway – it’s pretty neat. It’s an implementation of the Master of Orion 1 Starmap. I basically tried to copy it’s look and feel. What you can do (and that’s really the only thing you can do right now) is move around by clicking the map.

Go ahead and start the prototype.

So how does it work? There are three layers on top of each other – the top layer contains the colorful stars, the second layer contains the small dim stars and the third layer in the back holds a couple of very bright stars. As you scroll the map the layers are all moved differently hopefully giving you a sense of depth. The 2nd and 3rd layers are only static tiles. The colorful stars are the stars the player may actually colonize and fight over. They are stored in a database table and requested by the map script via an asynchronous call. The stars are returned as an array in JSON format. The client side is homebrew javascript goodness with the help of Prototype and the backend consists of a few PHP classes. Here’s a screenshot:

Master of Orion Starmap

A couple of things about the graphics: I find it difficult to produce random yet still visually pleasing star patterns. When I draw them myself I tend to distribute them very equally which looks kind of strange and not very random. You may notice this in the 3rd layer containing the few bright stars. The stars in the database are generated with the help of a self written map generator script that is supposed to distribute them randomly but not too close together. It doesn’t work very well yet as the stars are still distributed very equally.

So where I am going with this? Well the plan is to create a Master of Orion clone that you can play online with simultaneous turns and up to 16 players. Let’s see how that works out.

Second Prototype Update

Saturday, March 15th, 2008

The second prototype was updated. It is now a complete game. Well not really, however it is playable but lacks a concept. A new building was added – the command center. It serves as the main base of a player and can not be destroyed. Mechanisms to attack enemies were also added. A rudimentary ticker was added that gives units to each player depending on how many building he owns. Keyboard scrolling is another feature that was added. Players are now able to build bunkers. The more enemies a player kills the more bunkers he may build. Here’s a screenshot of the current version:

release2_version2

I also released the sourcecode under the GPLv3 and uploaded the files (the first and the second version) to the newly created Google Code project. The name of the project is JSGmap which is short for JavaScript Game Map. The project can be found here: http://code.google.com/p/jsgmap/. Unfortunately it is not possible to upload a public demo of the new version. However there’s a private version running on this server with ticks every 10 minutes. If you would like to take a look please leave a comment.

Second Prototype

Saturday, March 1st, 2008

Over one year after the first prototype was released, the second prototype is finished. It’s yet another graphical user interface for a strategy game.

Go ahead and start the prototype.

As a theme I chose again Starcraft – the ingenious realtime strategy game created by Blizzard Entertainment. Specifically I chose the “Bunker Wars” variation of the game where the players only have marines and bunkers available to play. Here’s what it looks like:

Release 2 Screenshot

The fist prototype was merely a Google-Maps like scrolling script that could display a section of a huge map and provide a convenient interface to navigate and scroll the map. It was all static JavaScript, no database backend, no unit movement or units no nothing. It looked like this:

Release 1 Screenshot

The new prototype features access management (which is circumvented in the demo), units are available and they can move and enter or leave bunkers. The map can be scrolled – the displayed map is 8×8 tiles – the actual map size is 100×100.

On the front end the prototype uses asynchronous JavaScript to reload the map without reloading the page and to issue unit movement commands to the server. The javascript library Prototype is used.

The backend consists of a MySQL database with 3 tables (users, map, units). A couple of PHP classes output the main page and two API interfaces are provided for the asynchronous JavaScript calls to update the map and to move a unit. It’s rather simple and functional and probably somewhat resource wasting but it works. It’s tested on Firefox 2 and Internet Explorer 7 and should also work with Internet Explorer 6.